|
About Family UW Photos
Aquashot Trip Reports RSDiver Photo Instruction
Wallpaper Images Software Site Map |
Macro TechniquesNote: this section is not yet complete. Please check back later. Macro photography, simply put, is any photography where the reproduction ratio is 1:3 or greater (i.e. 1:3, 1:2, 1:1, 2:1, etc). The reproduction ratio is the ratio of the size of the subject to the size of the image on film. 1:3 means "one third life size." So macro photography at 1:3 means that a 1-inch shrimp is 1/3 of an inch on film. Since the 35mm frame is roughly 1 inch by 1.5 inches in size, a 1:3 repro ratio means that the largest subject you can shoot it ~ 4.5 inches across...but mostly, when people use the word "macro" they're thinking of smaller subjects, things an inch in size or smaller. Macro is generally one of the easiest styles of underwater photography because lighting is easier, framing is easy to do, and (for Nikonos users) the focus is fixed. There are really only a couple of variables the photographer needs to control.
Here are the things you need to known when shooting macro. First off, you can usually set your strobe on TTL and forget it after that. The main rule of composition with macro is to fill as much of the frame as possible with your subject. This is the perfect situation for TTL flash control. About the only thing you have to control carefully with macro pictures is the aperture. The reason is that depth of field diminishes with increasing magnification. At high magnifications (i.e. "macro"), the depth of field is tiny -- often as little as a quarter or even an eighth of an inch (7 or 3 mm!) To get even that much DOF, you need tiny apertures. f/16 is about the widest aperture you can use, and that's probably useful only with 1:3 macro. At 1:1, you'll definitely want f/32, f/44 or even f/64. "But wait," you say, "my lens only goes to f/32 !" Read on! There's one effect you do have to account for with macro photos, called the bellows effect. Basically, if you're shooting macro you're going to extend the lens extra-far in order to get macro-style reproduction ratios. If you're shooting with a Nikonos rig, you use an extension tube to move the lens away from the camera body. If you're shooting a housed system with a macro lens, your macro lens will automatically extend itself...either way, you have increased the effective focal length of the lens in the process. For the same aperture setting, a longer focal length means a smaller effective aperture! Read digression #1 from Exposure 101 if you want to know why all of this is true. So if you're using a Nikonos 35mm lens and a 1:1 extension tube, even though you have the lens set on f/32, its actual or "effective" aperture is f/64! If you have a housed modern SLR, you probably don't need to worry about this, because the camera and lens are programmed to display the effective aperture rather than the one indicated on the lens. However, this can be misleading if you dial in your aperture while the lens is extended. For macro in housings, you're best off setting the aperture to the desired value at the start of the dive, while the lens is focussed on infinity, and then not touching if afterwards, regardless of what the camera tells you the effective aperture is. So what? If you're shooting TTL flash, the camera will let the flash run as long as it wants, regardless. The only reason you need to know the effective aperture is so you can figure out if your strobe is powerful enough. Review the Guide Number Equation if you're unfamiliar with it, because we're going to use it here. Let's say you're shooting 1:1 at an indicated f/16, which converts to f/32.
Then if the strobe is placed 1 foot from the subject, the guide number equation
tells you that you need a strobe with However, if you're shooting ISO 50 film (like Fuji Velvia, for instance), you
have to divide that GN by 0.71, so you'd need a strobe of guide number 45.
That's a hugely powerful strobe! Now you have a problem, and you have one
of two solutions available to you. Let's say you're shooting an Ikelite
SubStrobe 50, which has a guide number of 28. If you move the strobe in so that
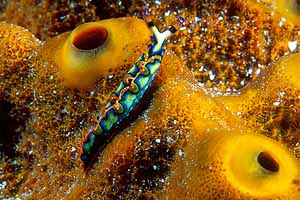
it's 6 inches from the subject, the equation looks like this: Another solution is to use two strobes. If you put both of them on-target, you get twice the light that you'd get from one strobe. Twice the light means 1.4x the guide number, so two SS-50 strobes on target deliver an effective guide number of 1.4 * 28 = 39. That's not quite enough to deliver the GN 45 punch we need for ISO 50 film an a strobe-to-subject distance of 1 foot, but it's much closer. Moving the strobes in just a couple of inches is an easy way to fix this problem. So now you see why most macro photographers shoot dual strobes: it makes the lighting much easier. In addition, two strobes reduce harsh shadows, which can be an important thing for good macro results. There is one thing you have to keep in mind when shooting macro with tiny apertures. Tiny apertures will make your background go completely black if it's water back there. Basically, tiny apertures make the strobe overpower the ambient light (unless you run ridiculously long shutter speeds, which really isn't an option most of the time). So anything that's not lighted with strobe light (like water) will be seriously dark, often completely black. Sometimes that's a great effect, but sometimes it's not. When shooting at an effective f/45 or f/64, remember to think about what's behind your subject, and whether you would prefer a black background or something colored. Shooting small subjects sitting on a coral head or a sponge is a great way to get a colored background. It also adds some context for the person looking at the picture, which is hardly ever a bad thing.
OK, enough technical talk. What about composition? Composition for macro shots is usually very easy. Fill the frame with your subject, and you're ready to rock. If you're shooting a Nikonos system, your framing choice will be made for you, because you're stuck at one focal distance and hence one field of view. The only way you can change the subject's size in the frame is to pick a different subject. But don't give up on subjects that are too small in the frame; as mentioned above, having some contextual information in the background is often a good thing. Also, you can always crop the photo to size later. About the only thing you have to look out for with macro photos is too-linear composition. That is, if you shoot a subject head-on in the center of the frame, it's going to be a boring photograph. You'll get better results if you try to find an interesting angle, either from above, the side, or below the subject. If you can orient your subject diagonally across the frame, you'll get a much more pleasing picture. There's another benefit to diagonal compositions in this case: you can fit a larger subject in the frame! If you're shooting a housed system, try orienting diagonally and moving in closer to the subject! Back to Techniques | Forward to Fish Portraits
| ||||||||||||
About | UW Photos | Scuba Picture Uv the Day | Flower Gardens | Aquashot | Trip Reports | RSDiver | Photo Instruction | News | Desktop/Screensaver Images | Site Map |
||

