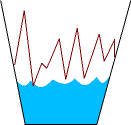
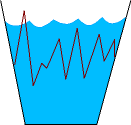
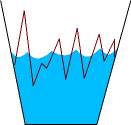
Photographic TerminologyThe terminology and concepts of photographic exposure control often confuse people and frighten them away from cameras. But it doesn't have to be that way; the conceprs are basically straightforward. But the words might foreign to you, so... Here's an analogy for you: let's say we're trying to produce an accurate model of the caribbean, with a bucket to hold the water, and a set of stone "mountains" to represent the islands. If everything is done right, and the model is perfect, the water level will rise to a point where just the right amount of each "mountain" is seen above the water as an island. If you have too much water, you'll get only the tips of the islands, rather than the whole islands. If there's not enough water, you'll see too much of the islands. Either way, your model will be wrong. Figure 1 shows the idea graphically. Figure 1: The "Islands" model
So your goal is to get the right amount of water in the
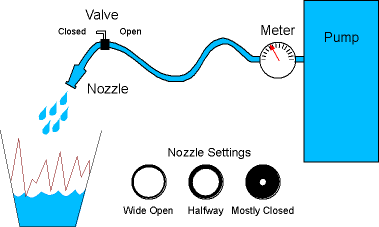
bucket. But how do you get water into the bucket? With a hose, of course. At the end of
the hose is a nozzle with a valve on it. The valve is either 100% "on," or 100%
off. That is, if you open the valve, water shoots out of the nozzle at full speed; if it's
closed, no water comes out. There is nothing in between. See figure 2 for a sketch of this gizmo in action. So how do you fill the bucket? Obviously, you set the nozzle to some reasonable value,
open the valve, and wait until the water reaches the right level. Eventually, by trial and error, you will come to a right length of time, and you will
record your numbers: "at 500 PSI, I had my nozzle set to 1/4, and I opened the valve
for 10 seconds, and got the right amount of water in the bucket." Then you
might perform an experiment: at the same 500 PSI, if you set your nozzle to 1/2, would 5
seconds be the right duration to fill the bucket properly? Sure it would.
So you might make a notation in your lab notebook that there's an inverse
relationship: doubling the width of the nozzle lets you open the valve for half the time
(and vice versa). In photography, this is called "reciprocity." Where is this stupid analogy going?
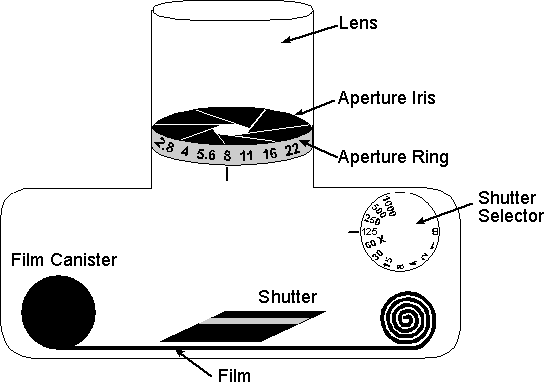
If you hadn't figured it out yet, the "Islands" experiment is an analogy for the way your camera works. In the analogy, the valve represents your camera's shutter, the nozzle represents your aperture, and the pump pressure represents how much ambient light you have. The brighter the day, the higher the pump pressure. Just like your water experiment, you have an on/off valve
(the shutter) and a stop watch (the camera has a built-in stop watch that opens the
shutter for the length of time you ask for). You also have a nozzle (the aperture
setting on your lens) that is calibrated in pre-set "stops" that represent how
much of the total area is open. The nozzle was marked 1/2, 1/4, 1/8 etc., where
each "stop" represents twice as much water per second, and your lens aperture is
marked f/2.8, f/4, f/5.6 -- but each aperture "stop" still represents twice as
much light per second. Click here if you want to know
why. Your pump had a meter that told you how much pressure was on the water--and
your camera has a meter that tells you how much light is all around you. Finally,
your "islands" gizmo had a way of telling you if the water level was right: you
just look inside the bucket and see for yourself. Similarly, your camera has a
similar way: you get your film processed, and see for yourself!
So now when you show up at the bucket and discover the pump is at half of yesterday's
pressure, you have another option. You can use a 'faster' model, and leave your nozzle and
valve settings alone! Of course, in the real world you have to pick your film speed when you load the camera, and it's tough to change afterwards. Then the meter will tell you the right combination of shutter speed an aperture (nozzle diameter and valve duration) to use for the light conditions and film speed (pump pressure and model scale). |
|||||||||||
About | UW Photos | Scuba Picture Uv the Day | Flower Gardens | Aquashot | Trip Reports | RSDiver | Photo Instruction | News | Desktop/Screensaver Images | Site Map |
||
